Welcome Christmas


I had fun making this card and with the Welcome Christmas stamp set by Stampin' Up! it was easy to make more than just one.

Instructions
1. I stamped the reef with Whisper White ink pad onto Real Red card stock set this aside for the ink to dry properly then add glitter glue onto the reef, allow the glue to dry overnight.
2. Stamp the family decorating the tree with VersaMark onto the base of the card.
3. Cut a wide stripe of Whisper White textured card stock and with Real Red and Garden Green markers, stamp JOY ramdamly onto this stripe.
4. Use the Scallop Trim Border onto Garden Green card stock attached this to the JOY stripe then mount this to the base of your card stock with snail adhesive.
5. Stamp the Season's Greeting with Chocolate Chip ink pad onto Whisper White textured card stock and cut around the frame, I then used Chocoalte Chip marker around cut area of the frame-give you a much neater look.  Then mount this to the base of your card with Stampin' Dimensionals adhesive dots.
6.  I punched two holes on the lower part of the reef which allows me to put the ribbon through.


Stampin' Up! Materials

Stamp Sets
Welcome Christmas - Wood 121584 or Clear 120597
 
12 x12 Card Stock
Whisper White Smooth and Textured - 119952
Garden Green Smooth-119709
Real Red Smooth - 119710

Tools
Snail Adhesive-104332 
Stampin' Dimensionals adhesive foam- 104430
Whisper White Craft Pad - 101731
VersaMark Pad -102283

Classic Ink Pads
Chocolate Chip - 100908 
 
Write Markers Individual Colours
Real Red - 100052
Garden Green - 100080
Chocolate Chip - 100071

Other Products
Glitter Glue
Ribbon

Christmas Decoupage


Decoupage for Christmas cards, I love doing this technique and it required a lot of work but fun to do.  For those who never tried it, decoupage usually consist of three or more of the same image.  You cut and layer all the images with 3D foam. You can also remove some parts of the image as you layer.

December Christmas Card - Week 1


Another year has flown by and Christmas is just around the corner.  So keep popping over I will be posting more Christmas cards ideas.

Christmas Owl


I love using owl stamps and this stamp set is by Hero Arts and I used Stampin' Up! Markers, card stock and Whisper White Ink Pad.  To finish off this card I added Glitter Glue onto each start.

New Punch Design


Stampin' Up! has adopted a new body style for our punches!

A few features of the new punch style:
  • Low-profile, rectangular punch body allows for easier stacking and storing
  • Punches lock shut for easier storage and transport
  • Dual labels on top and end allow for easy identification and selection when stored
  • Available in three sizes: small, medium, and extra-large
  • New punches allow for larger punched images and more intricate designs while providing greater ease of use.
  • Extra -large punch images also allow for two-step designs like the Two-Step Bird punch in the Autumn-Winter Mini Catalogue
  • Larger, whole-hand handle design provides better leverage for easier use
  • Available in an exclusive Stampin' Up! colour
Part of Stampin' Up!'s commitment to providing demonstrators and customers with the very best crafting tools includes the belief in what we call continuous improvement. Essentially what this means is that even if something works very well, but we see a chance to improve it, we will work to make it even better. While new punch designs will be in the new body style, existing designs will remain in the existing body style.


Christmas Greetings


I had some (a lot) of patterned paper that I was storing away and decided,
it's time to let them go and use it on my cards. 

Instructions
I aged the patterned paper with distressing ink 
Then I added glitter glue on the snowflakes. .
I made two small holes to allow the string to go through and secured it at the back.
Then I made a bow and attached it to the string with snail adhesive.
Once I stamped and cut the Christmas ball I mounted it with Mini Glue Dots onto the card.
I layered the patterned paper onto coloured card stock then onto the base of the card.
Christmas message was stamped with StaOn Black ink pad directly onto the patterned paper.

Stampin' Up! Materials

Stamp Sets
Tree Trimmings-116893
Occasional Greetings-115932
 
A4 Card Stock
Whisper White-106549

Tools
Snail Adhesive-104332 
Mini Glue Dots-103683
Paper Snips-103579
StazOn Black Ink Pad-101406

Classic Ink Pads
Orchid Opulence

Other Products
Pale Pink, Dark Pink Card Stock
Pink, Purple Glitter Glue
Silver String
Distress Inks


Christmas Deer


With this Christmas card I explored different techniques using inks, glitter and papers.  
I had fun making this card and I hope this inspires you to make a few.


Confirmation Card for Boys


It was time to make a Confirmation card for a boy and this was a chance to use my Big Shot machine (best machine ever).  To see the tutorial click here and the template click here.

Stampin' Up! Materials

A4 Card Stock
Whisper White-106549

Tools
Snail Adhesive-104332
Big Shot-113439

Other Products
Dove Die-Cut
Gold, Caramel, Brown Card Stock
Cross Punch 
Xyron Machine
Printer


Church Card Template


Church Card Tutorial


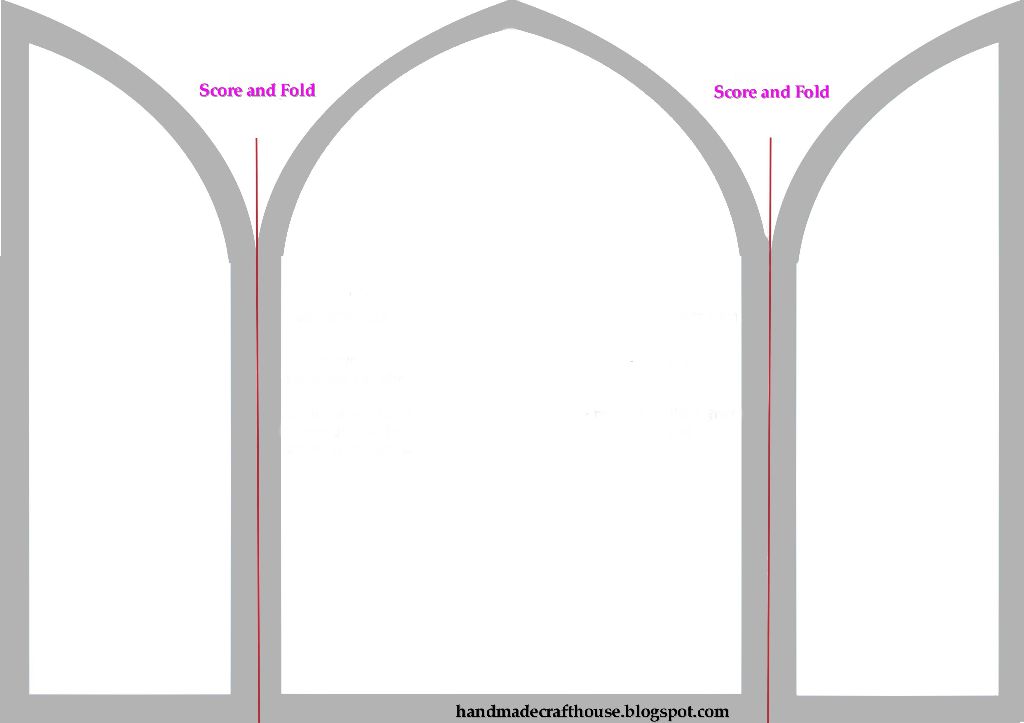
 Click template below and save as image to download the Church template.


 To print: select - landscape then select - to fit all.  Once I printed the template 
I attached it the dark card stock and cut around the gray outside lines.


 Fold the two flaps inwards and I sanded the top of the card to get the church shape I wanted.


With the template I cut the two flaps and attached this to the light card stock with tape.


With scissor and a trimmer, I cut in the inside of the gray lines.


Sand the tip parts of the door to form it's shape.


With double sided tape I attached to the base of the card.


I punched out two crosses in gold cardstock and placed them in the Xyron to get adhesive 
the back of the crosses.  I attached them to the lower part of the church doors.


I used my Big Shot for the bird and attached it to the top part of
the church doors with double sided tape.
 To complete the card I opened the two doors of the church and attached
a message inside.


Malta Trip


 I have just come back from a trip to Malta, it was wonderful seeing family and friends.  Speaking of friends I had caught up with my craft friend Dora.  We spent the day in Valletta and talked mostly about craft and I was fortunate to catch up with Dora again before leaving Malta.  It was great to seeing Dora again we had such a lovely time together.

.


Jolly Christmas


Christmas is just around the corner so I thought I better started making some Christmas cards, I find each year the list seems to get longer.  I can honestly say I had more mess in my craft room then cards.  I felt a bit rusty but once I had everything in front of me leaving myself just a little bit of room to work on, I felt relaxed and away I went. You will notice I have used some retired items from Stampin' Up!, I have mentioned them below by name but not with an order number, as these items cannot be ordered. For those I know who already have this stamp it's time to mix old with the new.

Stampin' Up! Materials


Stamp Sets
A Holly, Jolly Christmas

A4 Card Stock
Gable Green, Real Red-106578, Whisper White-106549

Classic Stampin' Pad
Gable Green, Chocolate Chip-100908, Basic Black-101179

Ribbon
Real Red 1/'2" Striped Grosgrain

Tools
Snail Adhesive-104332
Many Marvelous Markers-119806

Other Products
Jolly Christmas Stamp
Red Button

Confirmation for Girls


I enjoyed making this card and the Organic Outlines is such a beautiful stamp set.   I hope you had the chance to get your hands on this set before it retired.

Stampin' Up! Materials

Stamp Sets
Organic Outlines

Card Stock
Melon Mambo A4-119980

Classic Stampin' Pad
Melon Mambo-115656

Tools
Snail Adhesive-104332


Other Products
Oval Cutter
Lightweight Cross
String

Happy 30th Birthday


Stampin' Up! Materials

Stamp Sets
Greetings Galore, Happy Birthday Stamp

Card Stock
Whisper White A4-106549, Regal Rose-108612, Early Espresso A4-121686

Tools
Write Markers Set-119806
StazOn Ink Pad-101406
Snail Adhesive-104332


Other Products
Boarder PunchPattern Paper
Ribbon
30 Sticker.

Forever Friends Birthday Wishes


This is another stamp I received from Doreen when we visited one another.  I used chalks to colour the image and used tearing technique for the patterned paper.  I stamped two flowers from the image and mounted them on each side of the bear and add a birthday wish at the bottom of the card.

Just For You Card


I received this stamp from a craft buddie of mine from Malta so with some markers, patterned paper, mounting tape, coloured card stock and some pink ribbon, I created this card - Just For You, thanks Doreen.

Scratch and Sniff


Directions:
  1. Mix 1 part sugar-free drink mix to 1-1/2 parts Clear embossing powder. For example, you would mix 1 teaspoon drink mix with 1-1/2 teaspoons of Clear embossing powder (Figure 1). You'll have a scented embossing powder!
  2. Stamp your bold image in VersaMark ink on your card stock.
  3. Heat emboss the image using the scented embossing powder, just as you would with any other heat-embossing project (Figure 2).
Tips:
  1. Powders must be sugar-free because sugar crisps and browns. For the scent, select a sugar-free drink mix (or cocoa, cinnamon, or jelly crystals) for your project.
  2. When choosing the drink mix, consider both color and scent. Colored embossing powder will work for scratch-and-sniff images; however, unless you use embossing powder that is the same color as your drink mix, the colors may blend strangely.

Background Stamps


1]   With the background stamp face up, ink the stamp completely by tapping the ink pad on the rubber.
2]   Place the background stamp face up on your stamping surface.
3]   Place the card stock on the inked stamp.
4]   If the card stock is smaller than the stamp, cover the card stock with a piece of scratch paper.
5]   Rub the card stock with smooth, firm strokes, making sure to rub all areas of the stamp and to 
keep the card stock from sliding.
6]   Remove the scratch paper and carefully lift the card stock off the stamp.

QUICK TIP Create a multicoloured background by applying two or more inks to the 
background stamp.

Stamped Images © 1990 – 2008 Stampin’ Up!®

Artwork by Sandra Berlinski. All content is the sole responsibility of Sandra Berlinski, Independent Stampin' Up!® Demonstrator and the use of and content of the classes, services and products offered on this web site is not endorsed by Stampin' Up!®

LinkWithin

Related Posts Plugin for WordPress, Blogger...