Forever Friends Birthday Wishes


This is another stamp I received from Doreen when we visited one another.  I used chalks to colour the image and used tearing technique for the patterned paper.  I stamped two flowers from the image and mounted them on each side of the bear and add a birthday wish at the bottom of the card.

Just For You Card


I received this stamp from a craft buddie of mine from Malta so with some markers, patterned paper, mounting tape, coloured card stock and some pink ribbon, I created this card - Just For You, thanks Doreen.

Scratch and Sniff


Directions:
  1. Mix 1 part sugar-free drink mix to 1-1/2 parts Clear embossing powder. For example, you would mix 1 teaspoon drink mix with 1-1/2 teaspoons of Clear embossing powder (Figure 1). You'll have a scented embossing powder!
  2. Stamp your bold image in VersaMark ink on your card stock.
  3. Heat emboss the image using the scented embossing powder, just as you would with any other heat-embossing project (Figure 2).
Tips:
  1. Powders must be sugar-free because sugar crisps and browns. For the scent, select a sugar-free drink mix (or cocoa, cinnamon, or jelly crystals) for your project.
  2. When choosing the drink mix, consider both color and scent. Colored embossing powder will work for scratch-and-sniff images; however, unless you use embossing powder that is the same color as your drink mix, the colors may blend strangely.

Background Stamps


1]   With the background stamp face up, ink the stamp completely by tapping the ink pad on the rubber.
2]   Place the background stamp face up on your stamping surface.
3]   Place the card stock on the inked stamp.
4]   If the card stock is smaller than the stamp, cover the card stock with a piece of scratch paper.
5]   Rub the card stock with smooth, firm strokes, making sure to rub all areas of the stamp and to 
keep the card stock from sliding.
6]   Remove the scratch paper and carefully lift the card stock off the stamp.

QUICK TIP Create a multicoloured background by applying two or more inks to the 
background stamp.

Waterfall Card with Stampin' Up!


This waterfall card was for Mothers day, to see the tutorial click here and click here for the template
Stampin' Up! Materials

Stamp Sets: Vintage Label, Great Friend - 116889

A4 Card Stock: Whisper White -106549, Perfect Plum - 108615, Old Olive - 106576

Classic Ink Pads: Perfect Plum - 101437, Pixie Pink - 105212

Tools: Paper Cutter - 106583

Accessories: Stampin' Dimensionals - 104430
Other Products: Pink Gems, Purple Brads, Ribbon 


Moving Waterfall


This is a small clip to show you how this Waterfall card works.

Waterfall Card Template

Waterfall with Stampin' Up! - Tutorial


Waterfall Card


  • Base card measures 4" x 6" - Whisper White card stock
  • 4 Old Olive card stock measure 2.5" x 2.5" 
  • 4 Butterflies were stamped with Pixie Pink ink pad onto white card stock. Each butterfly image were cut out.
  • This is what makes the the 4 images move creating a waterfall effect.  A template is provided on this blog click here or my Templates to download a copy.
  • Templates measures 9.5" x 2.5" the 3 tabs can be slightly different measurements.
  • Cut template out in one piece of Perfect Plum card stock and score the four lines
  • Fold one scored line then unfold repeat the folds for all 4 scored lines.

  •  Fold over the top scored line completely over the other side equally in half
  • Before add the square down just make sure the single tap is the one touching your desk and side with two tabs is the side you are adding the squares - otherwise the waterfall will not work.
  • Stamp each square, this image is from the Stampin' up! Great Friend set with Perfect Plum ink pad to create a background image.
  • Add double sided tape at the top of each square
  • Attach the square just underneath the scored line and repeat this for each scored lines
  • Once you added all 4 squares down it should look like this and ready to add images to each square.
  • I added butterflies to each square with Stampin' Up! dimensionals for extra height.
  • Add 1 pink gem to the first butterfly then add an extra one as you go down the squares so the fourth square should have 4 pink gems.
  • With the Great Friend stamp set I stamped the frame and "for you" with Pixie Pink ink pad onto white card stock then cutting out the frame.
  • Add 2 pink gems into the frame then attach the frame onto the card with double sided tape.
  • Stamp the white card stock before adding the Waterfall..
  • Pierce a hole in the 2 side tabs to add the 2 purple brads through.
  • You need to mark with pencil 2 dots onto the base of the card where the 2 side brads are laying. So place the Waterfall onto the base of the card to get an idea where they will be placed.
  • Remove the Waterfall and open the card flat then pierce 2 holes where dots where marked to the front of the card.
  • Attach the Waterfall with 2 purple brad, 1 on each side.
  • Pull the tab right down to see if the Waterfall is working well.
  • I added a short video if you want to see how the Waterfall works.  If the video is not displayed on this front page of my website you can view it under Videos at the sidebar.
  • Add the ribbon onto the single tab with a purple brad to complete the Waterfall card.
For the template of the Waterfall click here.
.

    Watercolouring


    A]   Dip the tip of a blender pen on to the corner of a Stampin' Pastel, then apply to the stamped image.

    OR  

    B]   Press the closed lid of a Classic Stampin' Pad down against the ink pad, creating a small pool of
    colour in the lid; then open the lid. Use a damp watercolour brush or Aqua Painter to lift the ink from 
    the lid and apply.

    OR  

    C]   Outline a section of the stamped image with a watercolour pencil, then use a wet watercolour brush, Aqua Painter, or blender pen to pull colour where desired.

    QUICK TIP For more saturated colours, watercolour with Classic ink refills.

    Markers

    Experience these lovely techniques yourself by booking a free workshop with me and invite your friends along to gain free gifts and rewards.
    Book a workshop and contact me today!
    Click HERE.


    Technique A: Multiple Colours 
     
    1]   Use a marker to apply ink only to the desired parts of the image.
    2]   Add other colours if desired.
    3]   Breathe on the inked image to remoisten the ink before stamping onto paper.


    Technique B: Omitting 
    1]   To omit a certain part of a stamp image, use a marker to apply ink only to the desired parts of the image.
    2]   Breathe on the inked image to remoisten the ink before stamping onto paper.

    QUICK TIP Use a Stamp-a-ma-jig stamp positioner if you want to perfectly align the overlay image.

    Birdie Calendar


    I made lots of these for thank gifts for those who order from me in the first month of joining up with Stampin' up!

    Free Mini Calendars

    These calendars will fit on A4 size printing paper.
    Click to enlarge Calendar
    Select 'Save As' to save onto your computer.


    Clear Mount Rubber Stamps


    Over the past few years, there has been enormous demand from demonstrators and customers alike for a line of repositionable clear-mount rubber stamps. Well, you asked for it, and now you have it! Starting with stamps in the 2010 Autumn-Winter Mini Catalogue, Stampin' Up! now offers our exclusive stamp art in both traditional wood-mount, and the new clear-mount option.

    Our new clear-mount rubber stamps are the result of extensive research with the intent to maintain the very best image quality in the stamping industry, while at the same time offering the ease-of-use and storability inherent in repositionable clear-mount rubber stamps.


    Clear-Mount Rubber Stamp Features
    • Nine different sizes of clear blocks available individually or as a discounted bundle.
    • Blocks have ergonomic grooves on all four sides for easy grip and traditional wood-mount feel.
    • Stamps and blocks are durable and easy to clean with your Stampin' Scrub and Stampin' Mist.
    • Optional image labels on stamp backs let you decide if you want to see the image through the block or not.
    • Tight die-cutting for easy image positioning.
    • Large clear blocks can be used to create collages or spell words with alphabet sets.
    • Stamps store easily in standard, DVD-type cases with artwork on front and spine, making organization easy.
    Item 
    Description 
    AU Price 
    118487 
    Block A (3 x 3.2 cm)  
    $5.95
    117147 
    Block B (4.1 x 4.9 cm)  
    $7.95
    118486 
    Block C (5.1 x 5.7 cm)  
    $9.95
    118485 
    Block D (7.3 x 6.8 cm)  
    $13.95
    118484 
    Block E (8.7 x 11.3 cm)  
    $23.95
    118483 
    Block F (12.4 x 15.2 cm)  
    $33.95
    118489 
    Block G (6.4 x 1.9 cm)  
    $6.95
    118490 
    Block H (11.3 x 4.1 cm)  
    $13.95
    118488
    Block I (14.9 x 5.7 cm)  
    $23.95
    118491 
    Block Bundle (Blocks A-I)  
    $126.95 


    In this video, Bonnie Thurber talks about Stampin'  Up!'s clear-mount rubber stamps and why you'll absolutely love them! (not  all products shown are available in all markets)


    Click arrow to view Stampin' Up! Clear Mounts Video.

    Big Shot Die Cutting Machine


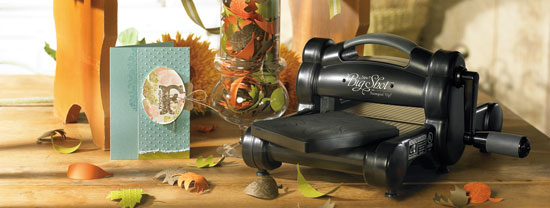
    There's a new big shot in town--the Sizzix Big Shot for Stampin' Up! The Big Shot is a sturdy manual die cutting machine used to die cut materials for use on crafts, home décor projects, and even clothing--it's a big deal! You'll love what the Big Shot machine--a six-time winner of Creating Keepsakes Reader's Choice Award for best die cutting equipment and dies--can do for you. 

    Design your own custom pillow appliqués using the Scallop Circle Bigz die or make custom fabric flowers to embellish a quilt. From sewing to quilting to home décor, the Big Shot is the perfect tool for many types of crafting. The wide appeal to various types of crafters will help you expand your business in new circles. The Big Shot makes incorporating paper crafting into these customers' hobby an easy progression. Use our Stampin' Up! exclusive dies to create die cuts and stencils with our artwork and designs for all your craft needs.

    Planning and preparing Make & Takes is fast and economical with the Big Shot machine. Cut out eight of the same chipboard letter or 20 scalloped pennants in just a few minutes. You'll be able to cut and score 3-D items in seconds, and the projects will be ready for your customers to enjoy. Or create embellishments for cards, scrapbook pages, or any other type of project by cutting multiple images at once. 


     *   *   *

    Big Shot-Approved Materials

    Big Shot Materials List for Bigz and Originals Dies
    The following materials work well when creating die cuts with the Big Shot machine and Bigz and Originals dies. Please note the maximum thickness of several materials. As a rule of thumb, you can cut a material with your Big Shot machine and Bigz or Originals dies if you can cut it using your Craft & Paper Scissors.

    • Thick corkboard
    • Thick chipboard (59 mil)
    • Colored magnet
    • Ruffle board
    • Paper wood
    • Balsa wood (3/32")
    • Bass wood (1/16")
    • Metal mesh
    • Aluminum (.016)
    • Tin (.008)
    • Adhesive and non-adhesive mat board
    • Drawer liner
    • Shelf liner
    • Vinyl
    • Static cling vinyl
    • Shrink film
    • Fine sandpaper
    • Clear acetate (20 mil)
    • Vellum
    • Card stock
    • Patterned paper
    • Flocked paper
    • Contact paper
    • Textured paper
    • Metallic paper
    • Linen paper
    • Suede paper
    • Embossed metallic paper
    • Basketball embossed paper
    • Faux alligator textured paper
    • Self-adhesive glitter paper
    • Fabric
    • Canvas
    • Iron-on fabric
    • Soft plush fabric
    • Burlap
    • Velvet
    • Corduroy
    • Lace
    • Heavyweight denim
    • Terry cloth
    • Funky fur
    • Thin leather
    • Quilt batting
    • Warm & natural batting
    • Fusible fleece
    • Self-adhesive craft metal
    • Self-adhesive cork
    • Self-adhesive foam
    • Self-adhesive magnet
    • Self-adhesive felt
    • Adhesive and non-adhesive rubber
    • Pop-up sponge
    • Poly foam
    • 100% pure beeswax (cut with parchment paper on top & bottom of beeswax.)
    The Big Shot works with ALL competitive dies, and the steel rule dies can cut through an impressive list of 50 different materials, including fabric, foil, and chipboard.


    *   *   *

    Premium and Extended Crease Pads

    We recommend the Premium Crease Pads and Extended Premium Crease Pads when using rule-based dies with score lines. The crease pads provide a flexible cutting surface that produces clean cuts and well-defined score lines. When using the crease pads, you should layer your sandwich to pass through the Big Shot in the following way (starting from the bottom):
    1. Standard or Extended Cutting Pad
    2. Shim (optional)
    3. Die, blade up
    4. Material to be cut
    5. Premium or Extended Premium Crease Pad*
    Shims are used to add thickness to the sandwich passing through the Big Shot machine, applying more pressure to the die and resulting in deeper score lines and embossed images. Plastic shims are included with each crease pad, but you can also use text-weight paper or card stock as a shim.
    The necessity of shims will vary among users. Due to the tolerable variances in the measurements of all products associated with cutting, results can slightly differ depending on the material being cut, the die being used, or even from one Big Shot machine to another. You should experiment to identify what works best (shim, no shim, extra shim, etc.) for the material you are cutting and the die you are using.
    *Use the Premium Crease Pad with Originals or Bigz dies. Use the Extended Premium Crease Pad with Bigz XL dies.


    Big Shot


    Click onto arrow to view Stampin' Up! Big Shot Video

    If you want to learn how to use the Big Shot, you can come along to one of my Open House Days or book a workshop and earn free products.  Contact Sandra for bookings HERE.

    Stamps


    In Stampin' Up!'s Idea Book and Catalogue, you'll find exclusive stamp sets that are unrivaled and unavailable anywhere else in the stamping world. With deeply etched images on foam-backed rubber that ensure sharp and clear stamped images, it is no wonder that our stamps-renowned within the stamping industry- earned the 2007 Creating Keepsakes' Readers' Choice Award for best rubber stamps-for the sixth year in a row!

    Stamp Assembly
    Trim rubber close to image. Make straight cuts.
    Match rubber to correct blocks. Trim and apply labels.
    Apply rubber, matching position of rubber with label.
    Apply label with stamp set name to the end of the box.

    *PLEASE NOTE MOST STAMPIN' UP! RUBBER STAMPS ARE LAZER CUT.  (No cutting required).


    Faux Metal

    Directions:
    1. Apply VersaMark over entire piece of card stock using the direct-to-paper technique. Sprinkle embossing powder over image (Figure 1).
    2. Melt powder using heat tool. Sprinkle on additional powder while the image is still hot, and reheat. Repeat up to three times (Figure 2).
    3. Press clean image into warm layers of embossing powder to create image (Figure 3). Punch or cut out image, and adhere to card.
    Tips:
    1. Experiment with solid and line images to achieve multiple looks, from impressed to raised.
    2. Try sanding the surface of your faux metal image to create a scratched look

    Definitely Decorative


    With Definitely Decorative stamping, you can create custom interiors at a fraction of the cost. Customize your home décor by stamping walls, fabrics, and other furnishings to give them an entirely new look. You'll also love how easy it is to create hand-stamped, framed art. Use any stamp set and colour palette to create custom home accents for any season or occasion.

    Stampin' Memories


    You may not realize it now, but your friends and family will be forever grateful to you for preserving your memories. Explore the variety of options Stampin' Up! provides to help you capture any theme or occasion. With Stampin' Up!, you can preserve your memories so that your family will enjoy reminiscing and poring over your albums in the future. Try our alphabet sets, font CDs, Simply Scrappin' Kits, Designer Series papers, quality albums, and more.

    Stamped Images © 1990 – 2008 Stampin’ Up!®

    Artwork by Sandra Berlinski. All content is the sole responsibility of Sandra Berlinski, Independent Stampin' Up!® Demonstrator and the use of and content of the classes, services and products offered on this web site is not endorsed by Stampin' Up!®

    LinkWithin

    Related Posts Plugin for WordPress, Blogger...